Part 6: Example Explorers#
An example explorer is a collection of Widgets designed to help users explore numerical examples of mathematical phenomena. You can find an introduction in this demo.
In Part 5: Doc Labels of this tutorial, we built a Proofscape deduction to represent the proof of the infinitude of primes, based on a version of that proof which we found in a PDF. We’ll now enrich our deduction by attaching an example explorer to one of its nodes.
A node deserving of enrichment#
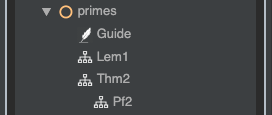
Let’s start by reviewing the deduction we built in Part 5: Doc Labels.
Double-click Pf2 under the Primes module in the “Structure” view in
the sidebar.
When the proof opens, find the node where we introduce the proof’s key construction, the number \(N\).
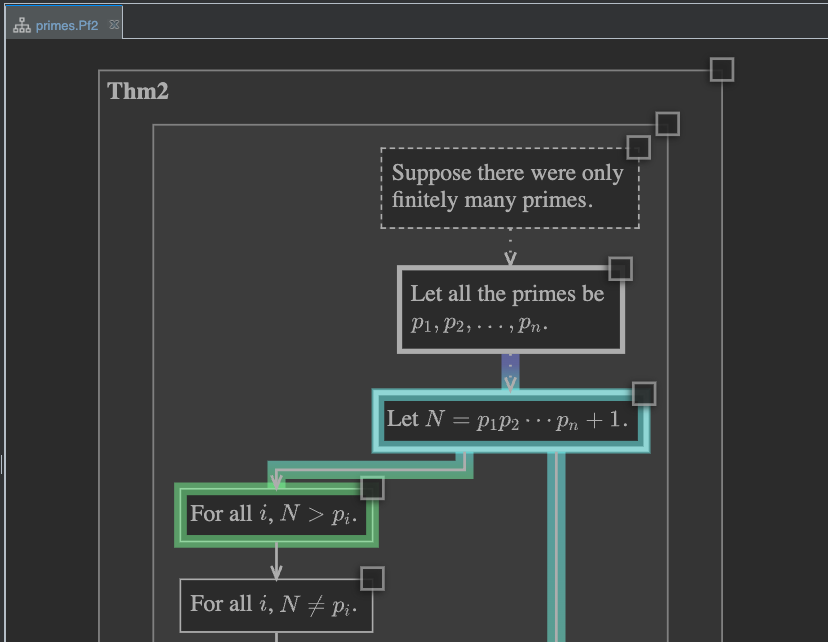
As we think about this construction, we might realize that it could motivate a nice little investigation. Instead of working under the reductio assumption active in the proof, that there be only finitely many primes, we could ask what happens in the real world, when we consider finite initial segments of the sequence of all prime numbers.
That is to say, we could investigate the numbers that are “primorials plus one” (a “primorial” being a factorial restricted to primes):
Are these numbers in fact always prime? The first three are.
We’ll build an annotation to help users explore this question. Whereas the annotations we built earlier in Part 2: Annotations were in some sense “standalone,” the one we build next will be explicitly attached to this node. This will allow users to discover it as an enrichment, from the node’s context menu. See Attachments.
Starting the annotation#
We’ll write our new annotation in the same source file where we defined the deduction.
You can open that now by right-clicking the same Pf2 you just double-clicked in
the sidebar, and selecting “Edit Source,” or you can right-click any node or deduction
in the chart panel and select the same.
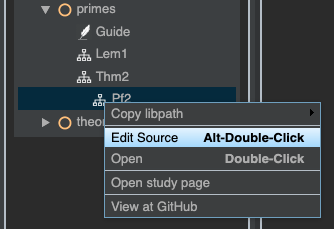
Fig. 3 Loading source from the sidebar#
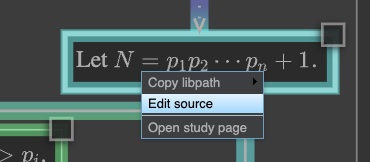
Fig. 4 Loading source from the chart panel#
When you’ve opened the source file, scroll to the bottom, and start a new annotation like this:
anno primorials_plus_one @@@
...
@@@
So far, this is nothing we haven’t seen before. However, we’ll now associate the annotation with the node we’re studying. In order to do that, we’ll need the node’s libpath. We could scroll up in the source file and locate the node’s definition, and determine the libpath that way, but there’s an easier method.
Right-click the tab of the chart panel, and select “Split and Move Right.”
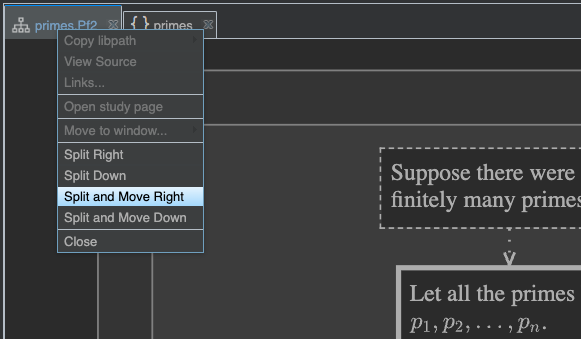
Now both source panel and chart panel are visible.
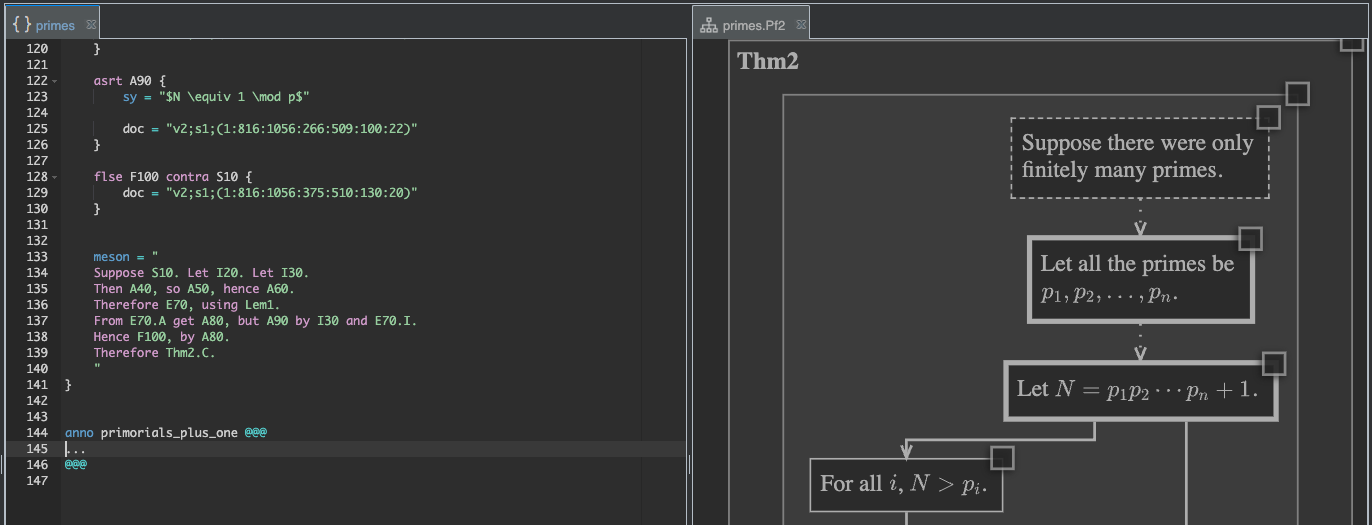
Once again find the node of interest, where the number \(N\) is introduced in the
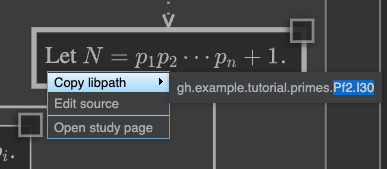
proof, right-click, and go to “Copy libpath.” In the tail selector that pops up
(we introduced tail selectors earlier in the tutorial),
move your mouse over the next-to-last libpath segment Pf2, and then click,
to copy the tail Pf2.I30 to the clipboard.
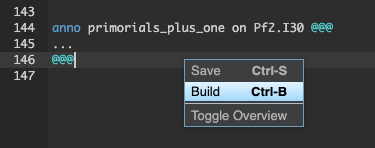
You can now go back to the new anno definition, and add an on clause, pasting
the copied libpath at the end:
anno primorials_plus_one on Pf2.I30 @@@
...
@@@
Important
Be sure you understand why we selected the libpath tail starting with Pf2.
Since we are defining an annotation that is a sibling of the Pf2 deduction
(they have the same parent module, gh.example.tutorial.primes),
we are working in a context where this relative libpath resolves correctly to
the node of interest.
Even though we haven’t yet written any actual contents in the new annotation, go ahead and build.
After the build completes, right-click the Pf2 deduction in the chart
panel, and select “Refresh links.”
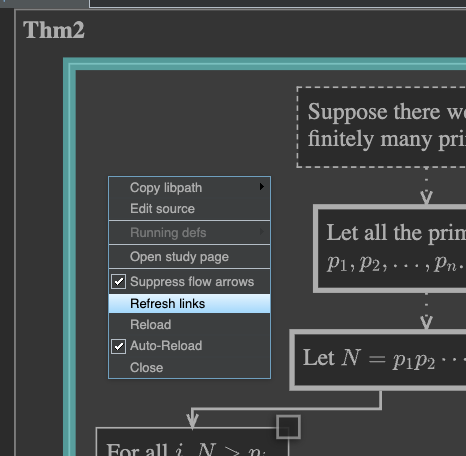
This causes PISE to load any new enrichments – like our new annotation – that may have been built since the deduction was first opened. Having done this, we can now right-click the node of interest (where \(N\) is defined) one more time, and the context menu will now list our new annotation.
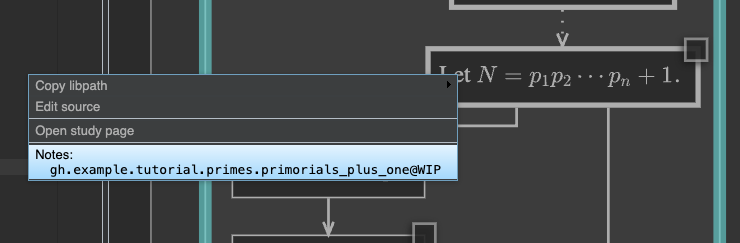
The on Pf2.I30 clause we added to the preamble of our annotation caused it to
be linked to the node in this way, as an available enrichment.
Building an example explorer#
We’ve started a new annotation, and linked it to a node, and we know what we want to do with it; namely, explore the numbers that are “primorials plus one,” and investigate the question of whether these numbers are in fact always prime or not.
In order to do that, we’re going to build an example explorer, using parameter and display widgets. See Examp Widgets in the reference manual, for the full details on how these widget types are coded.
Getting started with a parameter chooser#
We’ll start with a parameter widget to help the user select a prime number. Update your annotation to look like this:
anno primorials_plus_one on Pf2.I30 @@@
Under the *reductio* assumption of the proof, that there are only finitely many
primes, the number $N$ always turns out to be prime. But what happens in the real
world, where there are in fact infinitely many primes?

We'll investigate numbers of the form of $N$, and check whether they're actually
prime or not.

Start by picking a prime number $p$.

<param:eg1_p>[]{
    ptype: "Prime",
    tex: "p",
}
@@@
and build.
After the build completes, we should open the annotation we’re developing, so we can see how it’s progressing. We can of course open it from the “Structure” tab in the sidebar, as usual, but this time let’s instead take advantage of the fact that we linked it to a node in the chart. Right-click the target node, as we did earlier,
and this time click the name of our annotation in the context menu, in order to open it in a new notes panel.
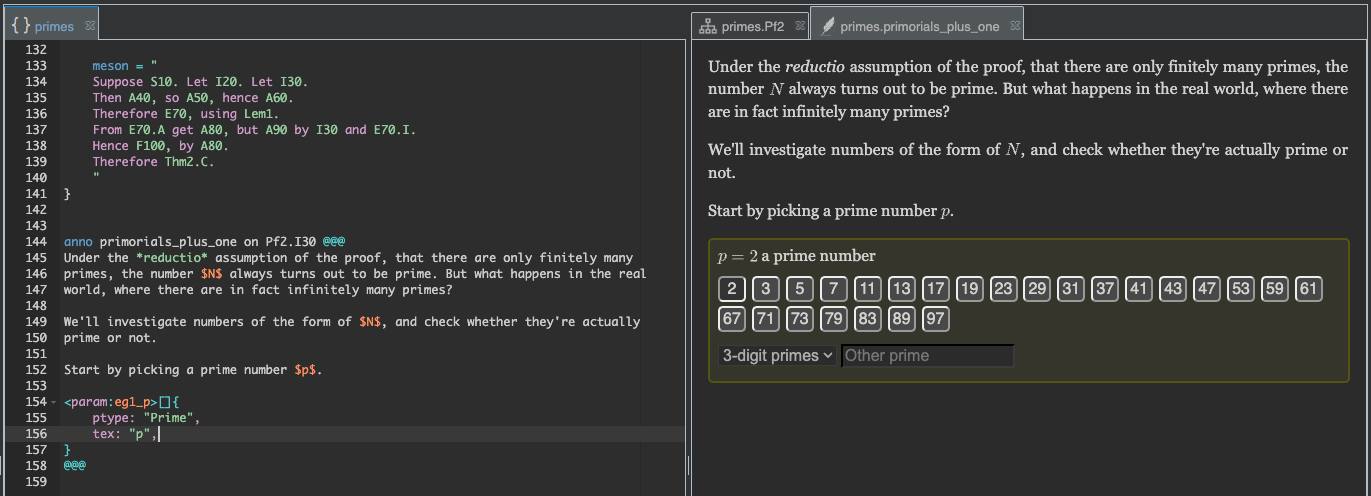
Our annotation is shaping up nicely, with an introduction to explain its purpose, and a parameter “chooser panel” to help the user select a prime number \(p\). However, as you look over the chooser panel, you may feel that it offers too much. After the buttons offering all the primes less than 100, there is a dropdown offering all the three-digit primes, and even a text box in which even larger primes may be entered manually. Will we need to go so far? Maybe not.
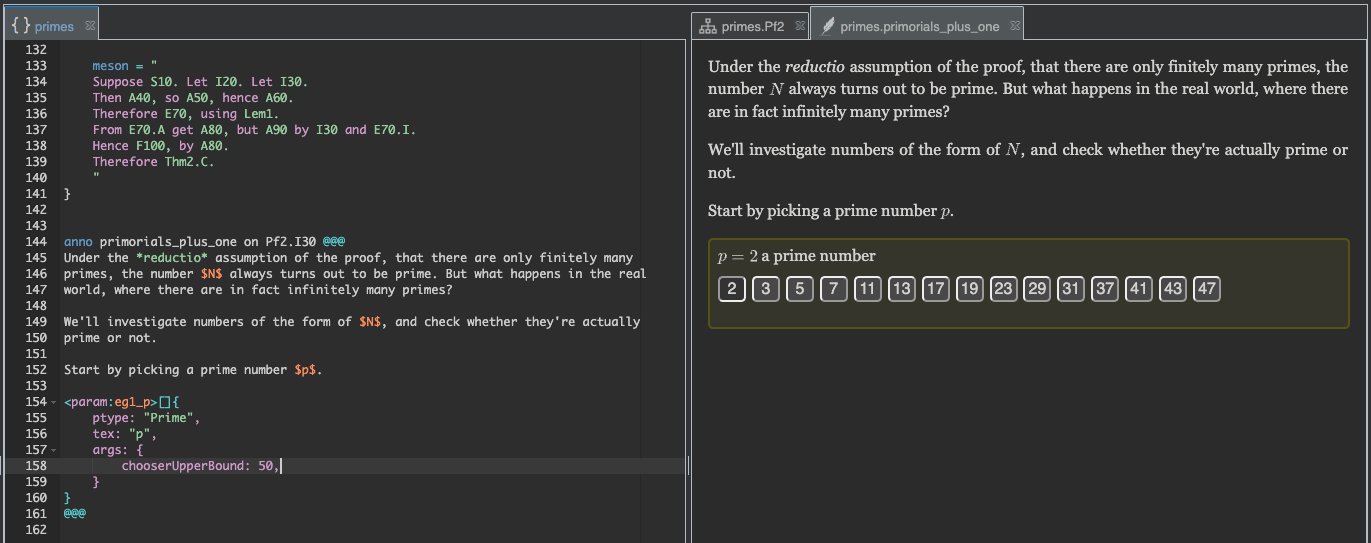
Supposing we decide to start with something more modest, we can go back now and edit our
first param widget, adding an upper bound:
anno primorials_plus_one on Pf2.I30 @@@
Under the *reductio* assumption of the proof, that there are only finitely many
primes, the number $N$ always turns out to be prime. But what happens in the real
world, where there are in fact infinitely many primes?

We'll investigate numbers of the form of $N$, and check whether they're actually
prime or not.

Start by picking a prime number $p$.

<param:eg1_p>[]{
    ptype: "Prime",
    tex: "p",
    args: {
        chooserUpperBound: 50,
    }
}
@@@
After amending your param widget as above, rebuild. The prime chooser panel now
offers a more limited selection.
See the reference on the Prime parameter type, for further details.
Building a display#
Now that we have a way to choose a prime number \(p\), we have to actually do something with it. This means it’s time to write a display widget. Display widgets are where you use parameter values to build mathematical displays.
As explained in the reference, we do this by writing Python code, using SymPy for mathematical calculations and symbolic manipulation. Our job is to build whatever string of HTML we want to be displayed in the page, and we can embed mathematical expressions in TeX syntax, to be typeset by MathJax.
Basic framework#
Before we write the Python code we want, however, let’s start by setting up a basic framework. Extend the annotation like this:
anno primorials_plus_one on Pf2.I30 @@@
Under the *reductio* assumption of the proof, that there are only finitely many
primes, the number $N$ always turns out to be prime. But what happens in the real
world, where there are in fact infinitely many primes?
We'll investigate numbers of the form of $N$, and check whether they're actually
prime or not.
Start by picking a prime number $p$.
<param:eg1_p>[]{
ptype: "Prime",
tex: "p",
args: {
chooserUpperBound: 50,
}
}
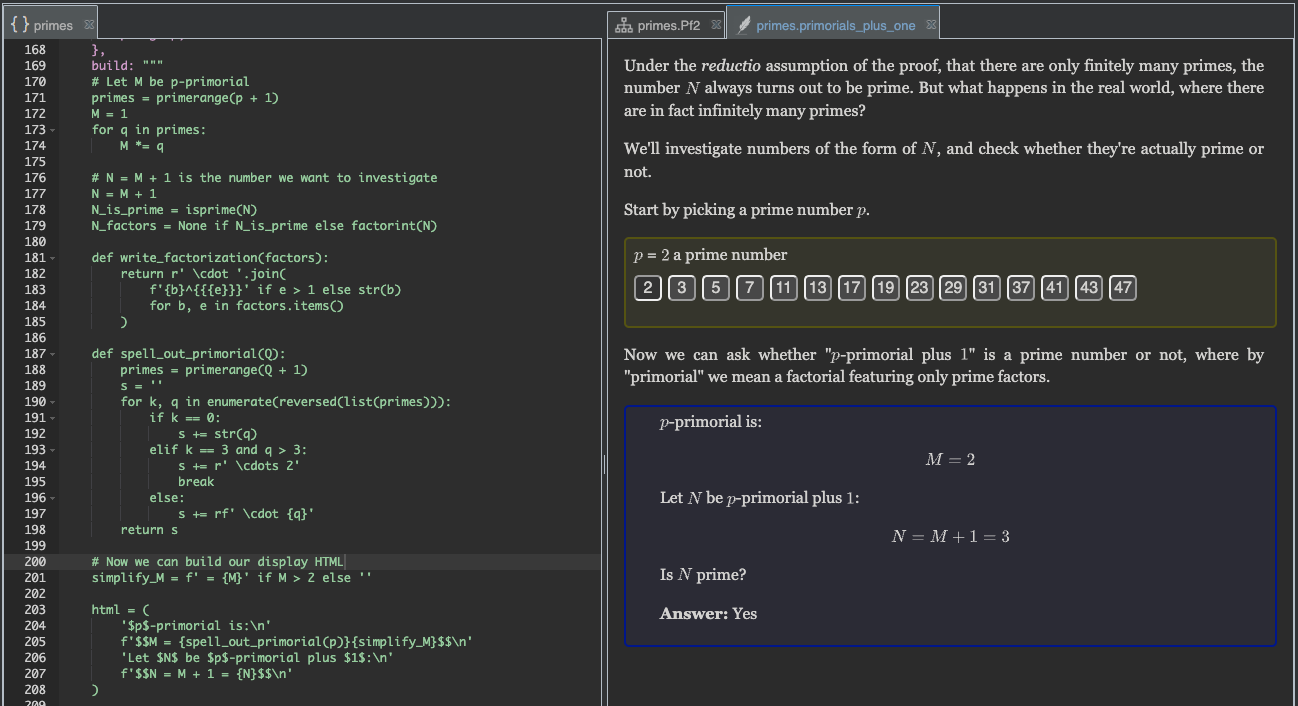
Now we can ask whether "$p$-primorial plus $1$" is a prime number or not,
where by "primorial" we mean a factorial featuring only prime factors.
<disp:>[]{
import: {
p: eg1_p,
},
build: """
html = f'<p>TO DO: Investigate $p$-primorial plus $1$ for $p = {p}$</p>'
return html
"""
}
@@@
We’ve added a bit of additional text after the parameter chooser, to explain to the user what
we plan to do, and we’ve started our disp widget. Notice that we’ve used the import field
in the disp widget to import the value of the param widget named eg1_p under the
local variable p. This will allow us to use the variable p in the Python code we’re going
to write, to generate the display.
Mark as trusted#
Even though our disp widget is still only a “stub,” go ahead and build now, in order to see
how the annotation page updates.
If your built page appears as in Fig. 5, with the display widget (blue box) showing its build code, instead of running that code to generate the desired display, don’t worry.

Fig. 5 Display widget in untrusted repo shows code, instead of running it.#
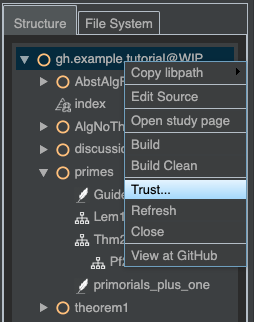
Because display widgets can contain arbitrary code, you have to formally trust the repo to which they belong, before they will run (except for repos for which trust is configred by default; see Trust settings). To do that, find the repo root module in the Sidebar, right-click it, and select “Trust…”.
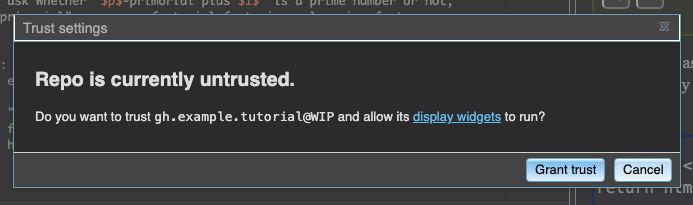
Click “Grant trust” in the dialog that comes up.
Now that you’ve said you trust the repo we’re developing (at the WIP or “work in progress” version),
the page should reload, and this time the display widget should run, generating the intended display,
as in Fig. 6.
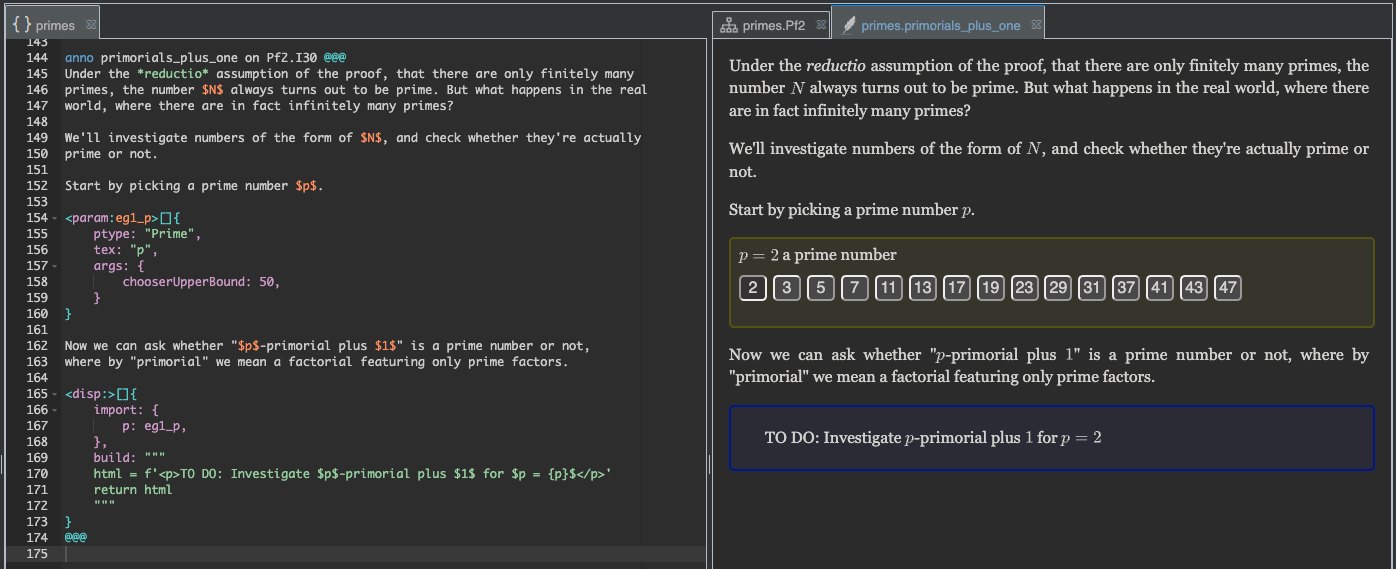
Fig. 6 Display widget in trusted repo runs code.#
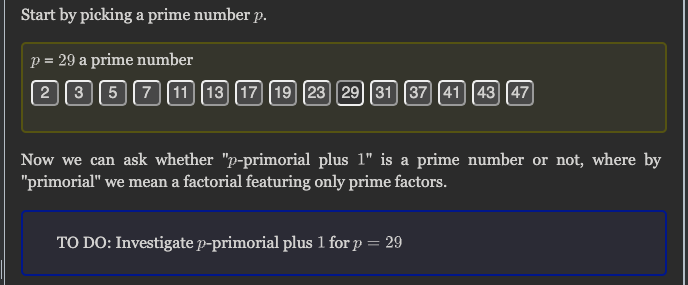
Of course, this still isn’t the display we really want. In the build field of our disp
widget, we’ve put some placeholder code, which is generating this simple “TO-DO” message, reminding
us of what we wanted to do.
However, you can already try clicking the buttons in the prime chooser panel, and see that the display box updates accordingly:
Building the desired display#
So far we’ve seen a nice, simple demonstration of how the display widget can use the value of the parameter widget, but it’s time now to build the display we actually want. We can do that using the Python code in Listing 22.
# Let M be p-primorial
primes = primerange(p + 1)
M = 1
for q in primes:
    M *= q

# N = M + 1 is the number we want to investigate
N = M + 1
N_is_prime = isprime(N)
N_factors = None if N_is_prime else factorint(N)

def write_factorization(factors):
    return r' \cdot '.join(
        f'{b}^{{{e}}}' if e > 1 else str(b)
        for b, e in factors.items()
    )

def spell_out_primorial(Q):
    primes = primerange(Q + 1)
    s = ''
    for k, q in enumerate(reversed(list(primes))):
        if k == 0:
            s += str(q)
        elif k == 3 and q > 3:
            s += r' \cdots 2'
            break
        else:
            s += rf' \cdot {q}'
    return s

# Now we can build our display HTML
simplify_M = f' = {M}' if M > 2 else ''

html = (
    '$p$-primorial is:\n'
    f'$$M = {spell_out_primorial(p)}{simplify_M}$$\n'
    'Let $N$ be $p$-primorial plus $1$:\n'
    f'$$N = M + 1 = {N}$$\n'
)

html += (
    '<p>Is $N$ prime?</p>\n'
    f'<p><b>Answer: </b>{"Yes" if N_is_prime else "No"}</p>\n'
)

if not N_is_prime:
    html += f'$$N = {write_factorization(N_factors)}$$'

return html
In Listing 22 we have used the SymPy functions primerange(), isprime(), and factorint() to help us build the number \(p\)-primorial, to determine whether that number plus one is prime or not, and, if not, to produce a factorization of it. We’ve also defined a couple of custom functions to help us format things nicely, and we’ve built and returned the HTML string we want to see in the display.
Copy and paste this Python code now, replacing the existing value of the build field in
the disp widget, so that your annotation now looks like this:
anno primorials_plus_one on Pf2.I30 @@@
Under the *reductio* assumption of the proof, that there are only finitely many
primes, the number $N$ always turns out to be prime. But what happens in the real
world, where there are in fact infinitely many primes?

We'll investigate numbers of the form of $N$, and check whether they're actually
prime or not.

Start by picking a prime number $p$.

<param:eg1_p>[]{
    ptype: "Prime",
    tex: "p",
    args: {
        chooserUpperBound: 50,
    }
}

Now we can ask whether "$p$-primorial plus $1$" is a prime number or not,
where by "primorial" we mean a factorial featuring only prime factors.

<disp:>[]{
    import: {
        p: eg1_p,
    },
    build: """
    # Let M be p-primorial
    primes = primerange(p + 1)
    M = 1
    for q in primes:
        M *= q

    # N = M + 1 is the number we want to investigate
    N = M + 1
    N_is_prime = isprime(N)
    N_factors = None if N_is_prime else factorint(N)

    def write_factorization(factors):
        return r' \cdot '.join(
            f'{b}^{{{e}}}' if e > 1 else str(b)
            for b, e in factors.items()
        )

    def spell_out_primorial(Q):
        primes = primerange(Q + 1)
        s = ''
        for k, q in enumerate(reversed(list(primes))):
            if k == 0:
                s += str(q)
            elif k == 3 and q > 3:
                s += r' \cdots 2'
                break
            else:
                s += rf' \cdot {q}'
        return s

    # Now we can build our display HTML
    simplify_M = f' = {M}' if M > 2 else ''

    html = (
        '$p$-primorial is:\n'
        f'$$M = {spell_out_primorial(p)}{simplify_M}$$\n'
        'Let $N$ be $p$-primorial plus $1$:\n'
        f'$$N = M + 1 = {N}$$\n'
    )

    html += (
        '<p>Is $N$ prime?</p>\n'
        f'<p><b>Answer: </b>{"Yes" if N_is_prime else "No"}</p>\n'
    )

    if not N_is_prime:
        html += f'$$N = {write_factorization(N_factors)}$$'

    return html
    """
}
@@@
Then once again build, and observe how the page updates.
Finally, we’ve done enough to actually explore the question: Are primorials plus one always prime? By clicking the buttons in the prime chooser panel, you can explore different cases. What do you find?
Checking multiple cases at once#
Our first example explorer provides the user with a nice tool to begin examining primorials plus one, but, for more serious pattern seeking, having to click a button to check each number one at a time may be a bit slow. We’ll now provide a second explorer, enabling the user to examine many cases at once.
Extend your annotation by adding the following text at the end, and then build.
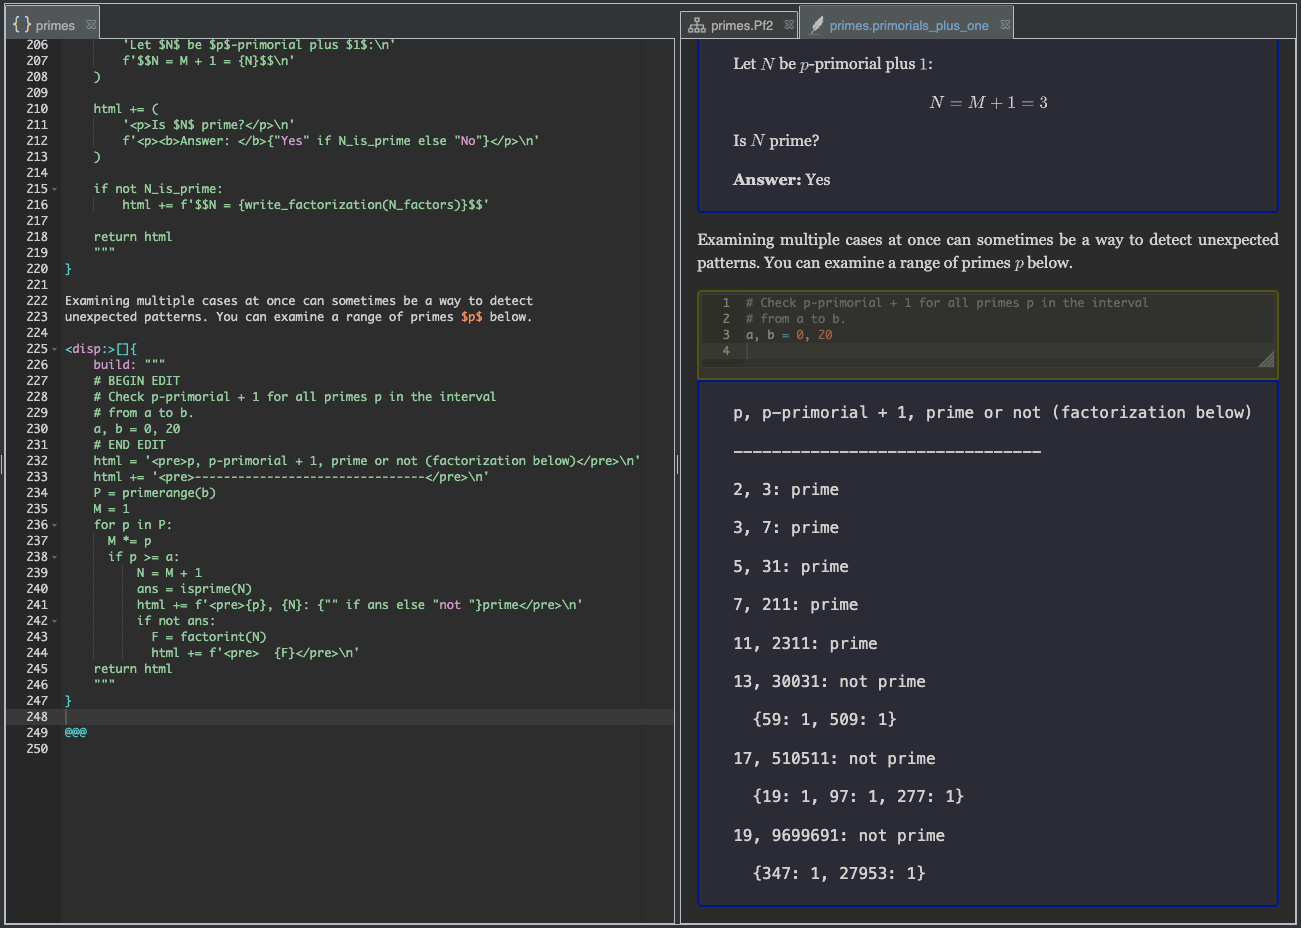
 1Examining multiple cases at once can sometimes be a way to detect
 2unexpected patterns. You can examine a range of primes $p$ below.
 3
 4<disp:>[]{
 5    build: """
 6    # BEGIN EDIT
 7    # Check p-primorial + 1 for all primes p in the interval
 8    # from a to b.
 9    a, b = 0, 20
10    # END EDIT
11    html = '<pre>p, p-primorial + 1, prime or not (factorization below)</pre>\n'
12    html += '<pre>--------------------------------</pre>\n'
13    P = primerange(b)
14    M = 1
15    for p in P:
16        M *= p
17        if p >= a:
18            N = M + 1
19            ans = isprime(N)
20            html += f'<pre>{p}, {N}: {"" if ans else "not "}prime</pre>\n'
21            if not ans:
22                F = factorint(N)
23                html += f'<pre>  {F}</pre>\n'
24    return html
25    """
26}
After building, you should see a new explorer at the end of the page.
Even though we only defined one display widget this time (no parameter widgets), we still
got both a yellow and a blue box. You can click in the yellow box, change the values of
the variables a and b, and then click the “hammer” button to re-run the display.
In order to understand where the yellow box came from, look again at
Listing 24, and notice lines 6 and 10 in particular,
which say # BEGIN EDIT and # END EDIT.
As explained in the reference, you can use this to place as
many editable sections into your display widgets’ build field as you wish.
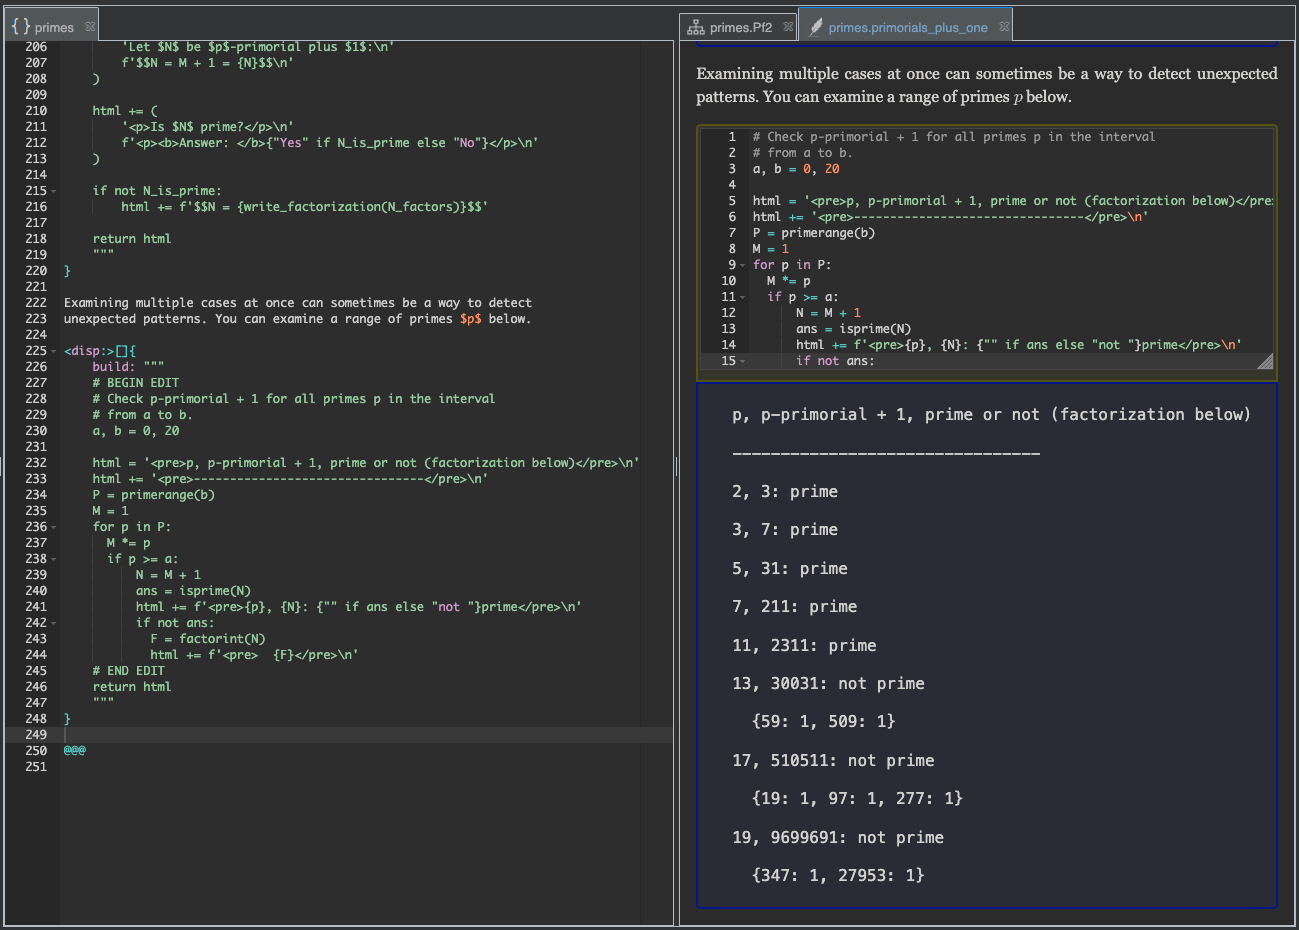
Exposing more code#
Question: Wouldn’t your users learn more if they could see all of the code, not just the editable section?
Answer: They can! They need only right-click the display widget, and they will get a “View source” option. (For you, it will say “Edit source.”)
While users can always view the full source code of any widget (disp or any other type)
by right-clicking as just described, there may be cases in which you want them to have free
rein over all the code defining a disp widget, right in the page.
To achieve that, you can always move the # END EDIT line to the end, just before
the final return statement that returns the HTML.
In the present case, that would look like this:
 1Examining multiple cases at once can sometimes be a way to detect
 2unexpected patterns. You can examine a range of primes $p$ below.
 3
 4<disp:>[]{
 5    build: """
 6    # BEGIN EDIT
 7    # Check p-primorial + 1 for all primes p in the interval
 8    # from a to b.
 9    a, b = 0, 20
10
11    html = '<pre>p, p-primorial + 1, prime or not (factorization below)</pre>\n'
12    html += '<pre>--------------------------------</pre>\n'
13    P = primerange(b)
14    M = 1
15    for p in P:
16        M *= p
17        if p >= a:
18            N = M + 1
19            ans = isprime(N)
20            html += f'<pre>{p}, {N}: {"" if ans else "not "}prime</pre>\n'
21            if not ans:
22                F = factorint(N)
23                html += f'<pre>  {F}</pre>\n'
24    # END EDIT
25    return html
26    """
27}
After making this change and building, you can see that the yellow box now exposes all of the code.
Summary#
You have learned how to:
Attach an annotation to a node, using an
onclauseBuild a
paramwidget, and customize its chooser panelImport the value of a
paramwidget into adispwidgetChange trust settings on a repo
Build an HTML display in a
dispwidgetMark a section of a
dispwidget’sbuildcode as user-editable