Part 4: Doc Widgets#
So far in this tutorial, we have worked with two of the three main Proofscape Content Types, namely, charts and notes. It is time now to work with the third type, docs (documents).
Proofscape doesn’t give you a way to generate documents (like it does with notes and charts), but it does give you ways to link to and navigate existing documents.
Such links are referred to generally as “doc refs,” and we will be looking at two types of doc ref in this and the next part of the tutorial. In this part, we will write a doc widget in an annotation, while in Part 5: Doc Labels we will use a doc label on a node in a deduction.
Open a document#
Find the “Doc” menu in the toolbar at the top of the PISE window, and select “Open PDF from the web…”. Enter this URL:
https://resources.proofscape.org/cors/pdf/example/primes.pdf
and click “OK”.
Note
This particular PDF has been prepared for use with this tutorial, and is served with something called CORS (cross-origin resource sharing) headers, so that PISE can easily load and display the PDF for you. PISE can also load PDFs that are served without CORS headers, but only if you install the Proofscape Browser Extension.
In a moment, a panel showing the PDF should load. At the top of the panel, toward the center, there are buttons - and + you can use to adjust the zoom level.
Make a doc ref from an annotation#
Let’s suppose you wanted to write some commentary on the proof of the “Theorem 2” appearing in this PDF. We’ll do that now by writing a new annotation.
Start by making a new submodule with filename primes.pfsc, under the
root module gh.example.tutorial.
(You learned how to make a new submodule here.)
Double-click the new file
to open it for editing, paste the text from Listing 9
into the editor, and build. (You learned how to build here.)
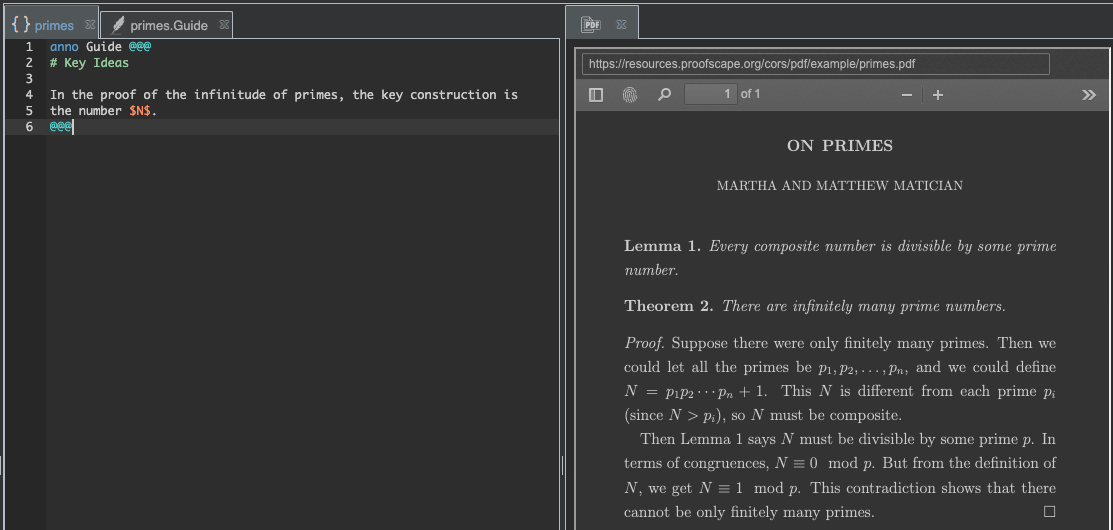
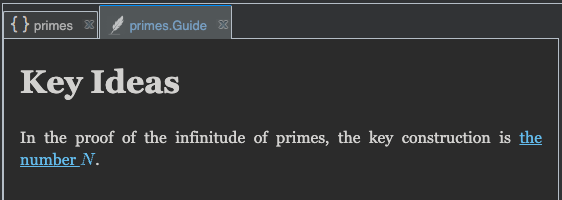
anno Guide @@@
# Key Ideas

In the proof of the infinitude of primes, the key construction is
the number $N$.
@@@
After the build completes, find our new annotation (called “Guide”) in the “Structure” tab of the sidebar, and double-click it to open.
What we have is a nice start, but it would be great if the reader could click the words “the number \(N\)” in our annotation, and this would automatically highlight the corresponding step in the PDF. In this part of the tutorial, we’ll make that happen by introducing a doc widget into our annotation.
First let’s get our workspace set up. Right-click the tab of the PDF panel, and select “Split and Move Right.” You should now have a vertical split, with the PDF panel on the right. Now select the editor tab in the left-hand group, so that it is once again visible. Your workspace should now look like this:
Define a doc info object#
Before we can create a doc widget, we have to be able to say which document we’re talking about. For this we’re going to define a doc info object to hold information about the PDF we’re looking at.
Start by adding the following lines at the top of the primes.pfsc file,
above the anno definition.
OnPrimes = {
    url: "...",
    docId: "...",
}
As you can guess, we’re getting ready to specify two facts about our PDF: (1) a URL where it can be found, and (2) something called a “doc ID”.
Let’s start with the URL, which you can copy from the bar at the top of the PDF panel.
Simply paste it into the editor, replacing the ... in the url line.
Next comes the docId line. First replace the ... in this line with pdffp:.
This stands for “PDF fingerprint,” and in a moment we’re going to paste a code after
the colon, by which our PDF can be recognized once opened.
In order to generate the fingerprint code, go to the PDF panel and, at the top left, find the button with a “fingerprint” icon, to the left of the “search” icon.
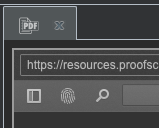
Click the “fingerprint” button to copy the PDF’s fingerprint code to the clipboard, then
go back to the editor and paste this code after pdffp:. Your file should now be as in
Listing 10.
OnPrimes = {
    url: "https://resources.proofscape.org/cors/pdf/example/primes.pdf",
    docId: "pdffp:6ad45bf008a7900624260330da212d75",
}

anno Guide @@@
# Key Ideas

In the proof of the infinitude of primes, the key construction is
the number $N$.
@@@
Define a doc widget#
Now that we have a doc info object, we can add a doc widget to our annotation. Find the final line,
the number $N$.
of our annotation, and replace it with the following lines:
<doc:>[the number $N$]{
    doc: OnPrimes,
    sel: "...",
}.
In the line that says doc: OnPrimes, we’re indicating that this doc widget is going
to point into the document we identified with the OnPrimes object we defined above,
namely, the PDF that’s currently sitting on the right-hand side of our workspace.
In the line that says sel: "...", we’re getting ready to define a specific selection
that we want to point to, within the document. In general, a selection can be any union of
boxes within a document; for the case at hand, a single box will do. Let’s form that box now.
In the PDF panel, find the “tools” button, which looks like a double chevron at the right-hand edge of the toolbar, and click it to bring up the tools menu.

Midway down the tools menu, find “Box Selection Tool,” and click that.
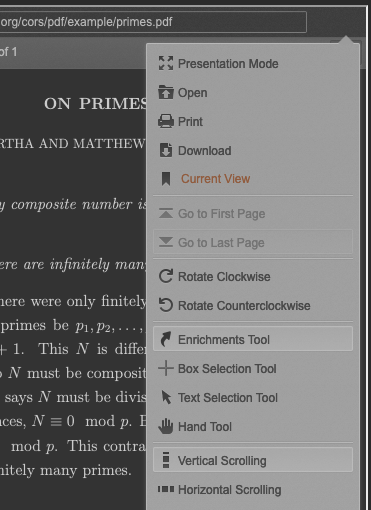
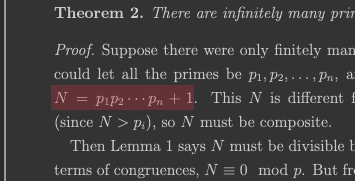
Your cursor in the PDF panel should now be a crosshair icon. Click and drag over the text in order to draw a box over the equation defining \(N\) in the proof.
If you don’t like the box you drew, you can move it by clicking and draging. You can also click the box once to select it, and then hit delete or backspace to delete it and try again.
Tip
Using the arrow keys, you can also adjust a box after selecting it (click the box once to select it). If you hold Shift, the arrow keys will move the box; if you do not, they will adjust its size. If you hold Alt, the adjustment will be faster.
When you’re happy with the box you’ve drawn, double-click it to open the “Selection Combiner” dialog.
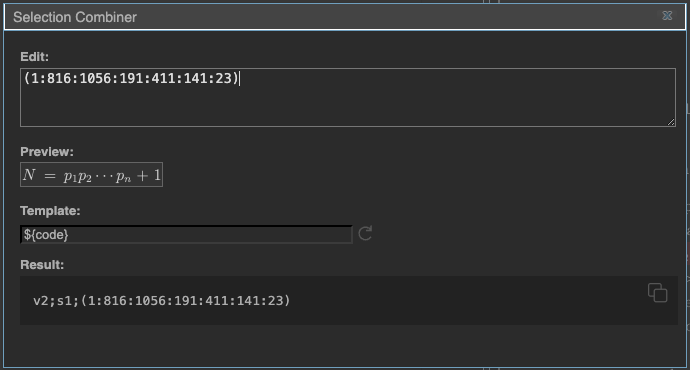
For now, you can ignore most of what you see in this dialog. (It’s useful when combining multiple boxes into a single selection.) Just copy the text from the “Result” box at the bottom, and then close the dialog. (Your exact text may differ from that in the figure.)
Now you can go back to the sel: "..." line in the doc widget you are defining, and replace
the ... with the text you just copied from the combiner dialog. After you do that, your
file should be as in Listing 11 (except that your sel code may
differ).
OnPrimes = {
    url: "https://resources.proofscape.org/cors/pdf/example/primes.pdf",
    docId: "pdffp:6ad45bf008a7900624260330da212d75",
}

anno Guide @@@
# Key Ideas

In the proof of the infinitude of primes, the key construction is
<doc:>[the number $N$]{
    doc: OnPrimes,
    sel: "v2;s1;(1:816:1056:191:410:142:25)",
}.
@@@
Now once again build, and then select the second tab on the left-hand side of your workspace, where the annotation page is still open from earlier. The words, “the number \(N\)” at the end of the annotation should now be clickable.
Using the doc widget#
Go ahead now and click the doc widget text, “the number \(N\),” in your notes panel. You should find that the widget text becomes highlighted, as does the box you selected in the PDF panel.
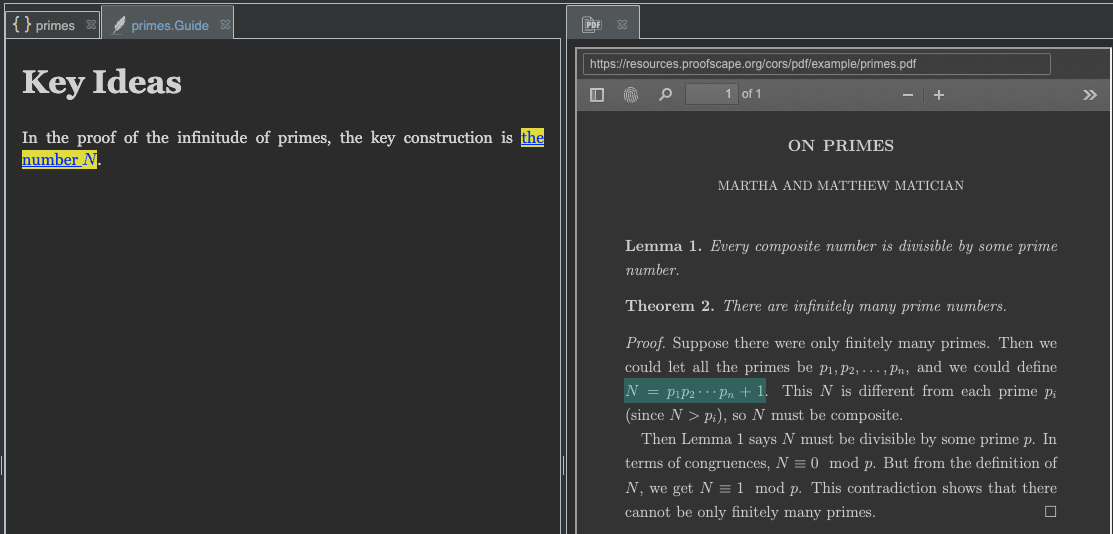
Next, click in the background area of each panel (notes and PDF), in order to take away these highlights.
Now hover your mouse over the equation defining \(N\) in the PDF panel. You should see that the equation is highlighted, and the mouse cursor changes. (If this isn’t working, go again to the double-chevron tools menu, and select “Enrichments Tool.”) If you click, the corresponding doc widget in the notes panel is highlighted.
Finally, close the PDF panel, and then try clicking the doc widget in the notes panel again. This time, the PDF opens, and the equation is highlighted.
Single-field form#
In the last section, we defined a doc widget (see Listing 11)
using two fields: doc, and sel. In the doc field we referenced the object
OnPrimes, in order to say which document we were talking about, while in the sel field
(for “selection’) we wrote a code that indicated a box we wanted to select within that document.
There is a more compact notation, whereby we can do both of these things in the sel field alone.
In primes.pfsc, change your doc widget definition now, to look like this:
<doc:>[the number $N$]{
    sel: "OnPrimes#v2;s1;(1:816:1056:191:410:142:25)",
}.
As you can see, we have taken the reference OnPrimes from the doc field, and moved it
to the front of the string defining the sel field, set off from the remainder of the code
by a # character.
Rebuild now, and you should find that your generated notes page continues to work exactly as before.
Using a template#
In the PDF panel, switch back to the “Box Selection Tool” (in the “tools” menu under the double-chevron icon), draw once more a box over the equation defining \(N\), and double-click the box to bring up the selection combiner dialog.
In the dialog, replace the contents of the “Template” box with the following text:
sel: "OnPrimes#${code}"
As you can see, the “Result” box now provides the entire definition of the sel field
for a doc widget referring to the OnPrimes document.
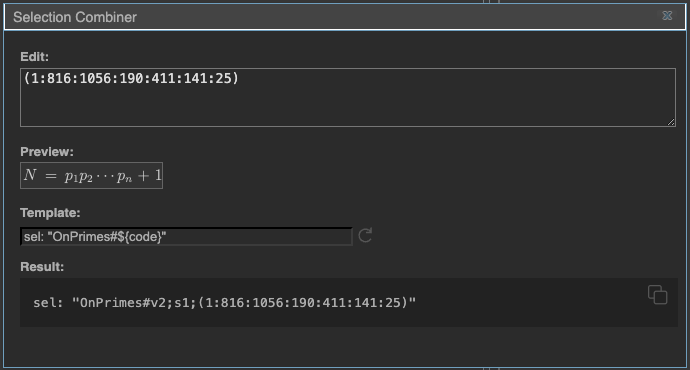
The next time you open the combiner dialog, the template will still be as you last set it, so, if you are going to make many references into a single document, setting a template can be handy.
Tip
In the “Template” box, the string ${code} will always be replaced by the
code that represents your desired combination of boxes. You can surround this with
whatever other text may be useful, depending on what you’re trying to do.
Add more doc widgets#
Before we wrap up this part of the tutorial, let’s add a few more doc widgets to our annotation, to give a somewhat better feel for how you can “narrate” a proof.
Extend your file primes.py by adding the three new doc widgets we’ve
added at the end of Listing 12.
OnPrimes = {
url: "https://resources.proofscape.org/cors/pdf/example/primes.pdf",
docId: "pdffp:6ad45bf008a7900624260330da212d75",
}
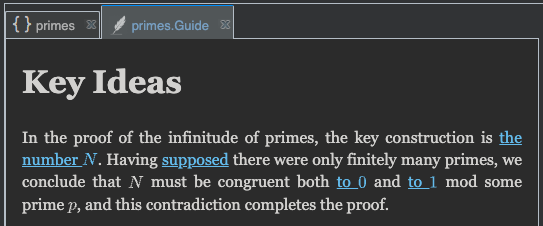
anno Guide @@@
# Key Ideas
In the proof of the infinitude of primes, the key construction is
<doc:>[the number $N$]{
sel: "OnPrimes#v2;s1;(1:816:1056:190:410:142:25)",
}.
Having <doc:>[supposed]{
sel: "OnPrimes#v2;s1;(1:816:1056:238:365:320:19)"
} there were only finitely many primes, we conclude that $N$
must be congruent both <doc:>[to $0$]{
sel: "OnPrimes#v2;s1;(1:816:1056:341:485:100:20)"
} and <doc:>[to $1$]{
sel: "OnPrimes#v2;s1;(1:816:1056:267:510:100:20)"
} mod some prime $p$, and this contradiction completes the proof.
@@@
Build once more, and switch back to the notes panel.
Try clicking through all the doc widgets, and watching the corresponding highlights in the PDF panel. Conversely, try sweeping the mouse cursor over the proof in the PDF panel, and clicking the highlights that come up as you hover over them.
Doc widgets in Sphinx pages#
We have now defined several doc widgets in an annotation, but you may be wondering whether you can do likewise in a Sphinx page. The answer is that yes, doc widgets are also supported in Sphinx pages.
Summary#
You have learned how to:
Open a PDF from the “Doc” menu
Copy a PDF fingerprint
Select a box in a PDF
Define a doc widget in an annotation
using the
docandselfields in combinationusing the
selfield alone
Use a template in the selection combiner dialog