Part 2: Annotations#
Once we have represented some theorems and proofs as deductions, and displayed these in chart panels (see Part 1: Getting Started with Deductions), we need a way to talk about, point to, and guide others through these charts. This is where annotations come in.
A Proofscape annotation is essentially just a page of text with interactive widgets that can open, navigate (pan and zoom), and highlight proof charts, so that you can write an animated discussion of a proof. (In fact widgets can do a lot more, like presenting interactive example explorers using an embedded computer algebra system; see Part 6: Example Explorers.)
Actually, annotations were historically the first way to generate such pages in Proofscape, but now there is another way, which we cover in Part 3: Sphinx Pages. Sphinx pages are a great way to develop larger works, with tables of contents and all the other features you get with Sphinx. Annotations are still useful as a way to write shorter or simpler notes.
Add a short annotation to an existing file#
Carrying on from Part 1: Getting Started with Deductions, you should still have the file theorem1.pfsc open
in an editor panel in PISE. At the end of the file, add the following text:
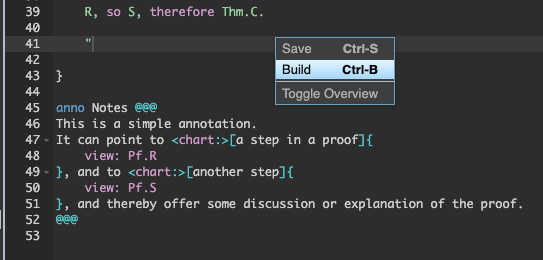
anno Notes @@@
This is a simple annotation.
It can point to <chart:>[a step in a proof]{
    view: Pf.R
}, and to <chart:>[another step]{
    view: Pf.S
}, and thereby offer some discussion or explanation of the proof.
@@@
You have just defined an annotation, which contains two chart widgets. The full syntax for annotations and widgets is given in the Annotations reference section.
Now, once again, do a build (right-click the background of the editor and select “Build”, or just hit Ctrl-B in the editor).
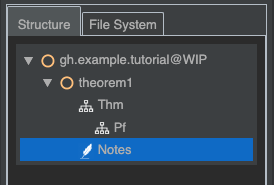
After building, your new annotation (called Notes) should now be visible in the
Structure tab of the sidebar. Double-click it, to open.
Now you can see your annotation, in which the two chart widgets appear like links that say, “a step in a proof,” and “another step.” Go ahead and try clicking the chart widgets now.
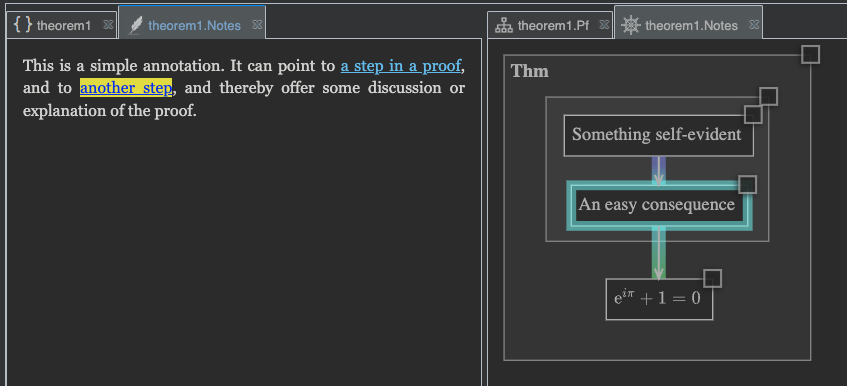
As you can see, we get a copy of the chart that is navigated by our annotation. As we click the chart widgets, nodes in the proof light up.
Tip
Find the “Chart” menu in the toolbar at the top of the PISE window, go to “Selection Style,” and try changing the way nodes are highlighted.
Note
If you still had the chart panel open from Part 1: Getting Started with Deductions, and if you expected that chart panel to be navigated, instead of a new one opening, there is an easy way to make that happen, but it is not the default behavior. Hint: you can drag the tab of any chart panel and drop it onto the main area of the notes panel. For full discussion see Linking.
Write an annotation in its own file#
Above, we added a short annotation to an existing .pfsc file. If you wanted to write a
somewhat longer annotation, you might want to put it in its own file, and then you would
need to make Imports in order to link it to proofs. In this section we do that.
Go back to the “File System” tab in the sidebar,
right-click the root directory (gh.example.tutorial), and select New Submodule.
In the dialog box, enter discussion.pfsc as the desired filename, and click “OK” (or hit Return).
This should create a new file, discussion.pfsc. Double-click it to open it in an
editor panel. (Here we’re repeating steps we already did in Make a new pfsc file in the editor,
so see that section for relevant screen shots.)
Copy a libpath using a tail selector#
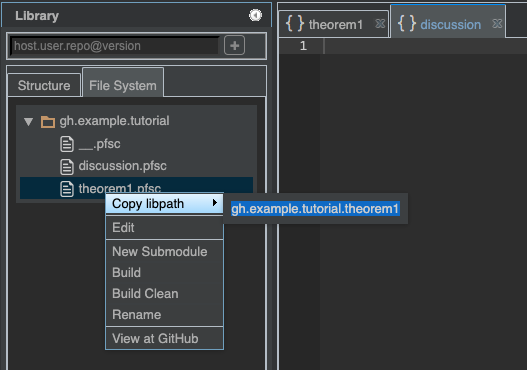
Next we’ll make an import statement. Find our first file, theorem1.pfsc, in the
“File System” view, right-click it, and select “Copy libpath”. You should get a popup showing
the full libpath gh.example.tutorial.theorem1 of the theorem1 module.
(See Libpaths for repos and modules.)
Try sweeping the mouse pointer left and right across the libpath gh.example.tutorial.theorem1
in the popup. Some tail of the libpath is always highlighted,
and when you click you’ll copy just this tail. This is very handy when you’re writing
Proofscape modules, and you’ll find similar “tail selectors” (as they’re called) on many other
types of objects, such as nodes in proof charts, and more.
For our purposes, we want to copy the whole libpath, so move your mouse to the left-hand
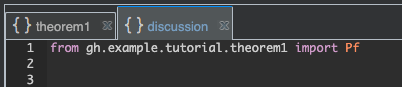
end, over the gh segment, and click. Now go into the editor panel for our new file, discussion.pfsc,
and enter the import statement depicted below, using Ctrl-V or Cmd-V to paste
the libpath you just copied at the appropriate point.
Build an annotation#
Now that we’ve imported the Pf deduction from the theorem1 module, we can successfully
define in this new discussion.pfsc file an annotation that points to that proof. We’ll do
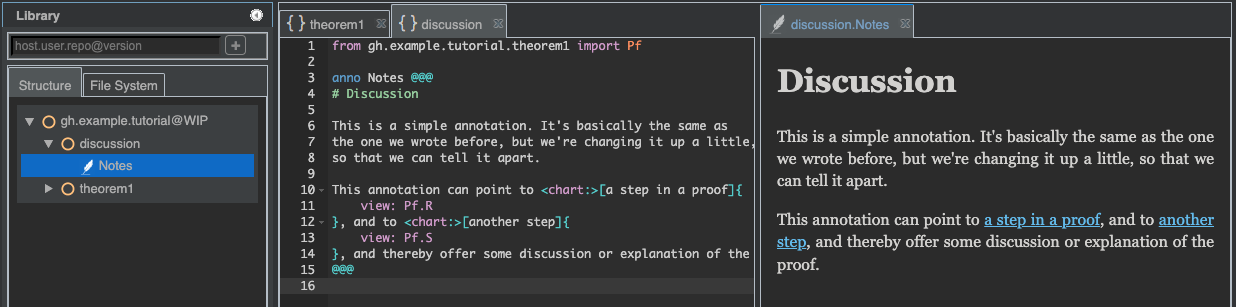
almost the same annotation as before, but change it up a little bit. Make the full contents of your
discussion.pfsc file as below (be careful not to duplicate the import statement you already
wrote above), and then build.
(We presume you know how to build by now. One last hint: Right-click, or hit Ctrl-B in the editor!)
from gh.example.tutorial.theorem1 import Pf

anno Notes @@@
# Discussion

This is a simple annotation. It's basically the same as
the one we wrote before, but we're changing it up a little,
so that we can tell it apart.

This annotation can point to <chart:>[a step in a proof]{
    view: Pf.R
}, and to <chart:>[another step]{
    view: Pf.S
}, and thereby offer some discussion or explanation of the proof.
@@@
After building, you should be able to find discussion, and Notes below it,
in the “Structure” view in the side bar.
Double-click Notes to open the new annotation.
Form a directory#
So far, we’ve been adding new files to our gh.example.tutorial Proofscape repo , but we haven’t
yet added a new directory. We’ll do that now.
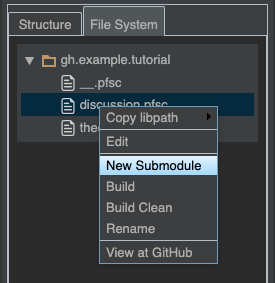
First close the discussion.pfsc source file, if you currently have it open in an editor panel.
Now, moving back to the “File System” tab in the sidebar, right-click the discussion.pfsc file, and
click “New Submodule”.
You should see a dialog asking for the name of the new file, and warning you
that the file you right-clicked is going to be converted into a directory plus __.pfsc file.
Don’t worry, everything you wrote in the discussion.pfsc file will be saved; it will
simply move into the new __.pfsc file, as you’ll see in a moment.
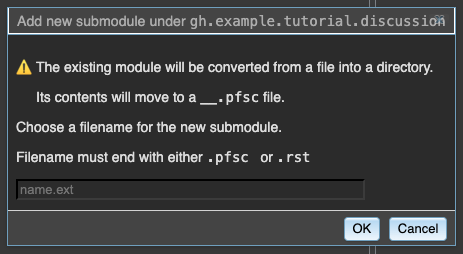
Go ahead and enter the name chapter1.pfsc for the new file, and hit Return.
The “File System” tab should now reflect the new file structure:
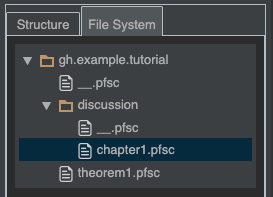
Notice that, where the file discussion.pfsc was before, you now have a directory called discussion,
with two files inside of it: __.pfsc, and chapter1.pfsc. Open the __.pfsc file now, and
notice that it holds the contents that were in the discussion.pfsc file before. Open the new file
chapter1.pfsc as well. This of course is empty, as it simply represents the new submodule that you
just asked for.
In terms of the formal concepts defined in the reference section on Modules, you have just
converted the terminal module with libpath gh.example.tutorial.discussion into a non-terminal module.
In practical terms, this just means that it is now ready to have further modules defined under it,
because it is now represented in the filesystem by a directory (plus a __.pfsc file to hold its
own contents). In fact, it already does have a new module defined under it,
with libpath gh.example.tutorial.discussion.chapter1.
Note
You are always free to form files and directories in your Proofscape repo by any means you like, such as working at the command line, or in a “file manager” program of some sort. You do not have to use the “New Submodule” command in PISE, as we have done so far in this tutorial. In particular, if you ever want to convert a non-terminal module back into a terminal one, this is not supported in PISE and you will have to do it manually.
Add the following text to your new file chapter1.pfsc, and build it.
anno Intro @@@
# Chapter 1

Here begins the first chapter...
@@@
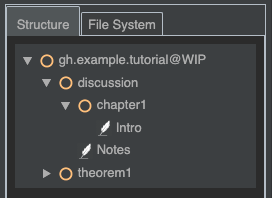
Returning now to the “Structure” tab in the sidebar and expanding the tree as necessary, you should
see that the discussion module still defines an annotation called Notes, and that now it
also has a submodule called chapter1. The latter defines an annotation called Intro.
Widget types#
In our examples so far, we have used two chart widgets. There are many different widget types available, which can do such things as:
Open, navigate (pan and zoom), and highlight proof charts, so that you can write an animated discussion of a proof.
Generate interactive and editable mathematical examples using a computer algebra system, so that you can further illustrate the mathematics happening at any given step in a proof.
Present questions, with hidden answers.
Provide checkboxes for users to record their progress.
See the reference docs on Annotations for a full listing of all the different widget types, and all the available options and parameters to control what each one does.
Summary#
You have learned how to:
Write an annotation
Write a simple chart widget in an annotation, to select a node in a proof chart
Copy a libpath using a tail selector
Write an import statement
Write a comment
Convert a terminal module into a non-terminal module
Comment syntax#
In
.pfscfiles, lines beginning with#are comments. Try commenting out theimportstatement at the top ofdiscussion.pfscnow, and then try to rebuild the file. You’ll see an error message, confirming that you do need the import statement, and that the#character did turn that line into a comment. Uncomment theimportline and build again, to get things back to normal.Note
Inside an annotation, i.e. after the opening
anno NAME @@@and before the closing@@@, you’re using Markdown syntax, so#characters make headings, not comments. See the reference section on Annotations.