Part 3: Sphinx Pages#
As discussed in Part 2: Annotations, annotations aren’t the only way to record notes that can automatically navigate proof charts in PISE. For larger and more involved works, with many linked pages featuring tables of contents, you might want to use Sphinx pages.
If you’re not already familiar with Sphinx, this tutorial you are reading was written in it, so you are seeing an example of it right now!
Sphinx pages are written in “rST” or “reStructuredText”, and there is a nice primer on rST in the Sphinx documentation.
Be sure you have at least completed Part 1: Getting Started with Deductions of this tutorial, so that you have an example repo ready to go.
Make a conf.py file#
If you want to define any Sphinx pages in your Proofscape repo, you have to have a conf.py file at the root level. Editing Python files is not (yet) supported in PISE, so please open your favorite text editor now, enter the following text,
html_title = 'Some amazing math notes'
author = 'Some Person'
copyright = '2023, Some Person'
and save the file as ~/proofscape/lib/gh/example/tutorial/conf.py.
You can of course adjust the title, author, etc. if you like.
Make an index.rst file#
You also have to have an index.rst file at the root level of your Proofscape repo,
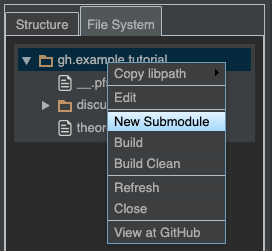
if you want to define any Sphinx pages. In PISE, go to the “File System” tab in the sidebar,
right-click the root directory gh.example.tutorial, and select “New Submodule”.
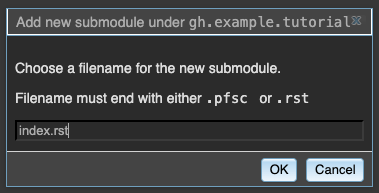
Enter index.rst as the filename in the dialog box, and click “OK” or hit Return.
Write pages#
With the fundamentals out of the way, it’s now time to start building some interconnected pages.
Let’s imagine that you were taking a course in abstract algebra, and you decided to record your own notes on the proofs from your course textbook. It would make sense to organize your notes according to the chapters and sections of the book, so we’ll now form several files and directories to get that started.
Using the same technique we used a moment ago to form the root-level index.rst file
(see Make an index.rst file), form the following new submodules, in the order shown:
Under… |
…make new submodule… |
|---|---|
|
|
|
|
|
|
|
|
|
|
|
|
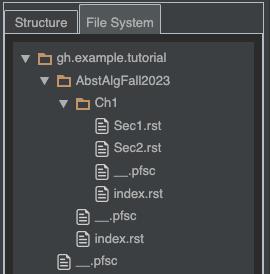
When you’re done, you should have the files and directories depicted here:
Note
If you don’t want to use the “New Submodule” command in PISE, you can form all the
same files and directories at the command line, or any other way you prefer.
Don’t forget to form the __.pfsc files (they can be empty) that “New Submodule”
is automatically making for you when it creates new directories. See Modules.
Next, we need to write some rST in the files we’ve formed, in order to get things started. In each listing below, the caption tells you which file to edit. Double-click that file to open it in PISE, and then paste the contents given here into the editor panel in PISE.
=================
Math Course Notes
=================

In these pages, I'm going to record notes on proofs
from my math courses.


.. toctree::
    :maxdepth: 2

    AbstAlgFall2023/index
===========================
Abstract Algebra, Fall 2023
===========================

This is my first semester of abstract algebra.
We're using textbook *Such and Such*, by So and So.

.. toctree::
    :maxdepth: 2

    Ch1/index
=========
Chapter 1
=========

.. toctree::
    :maxdepth: 2

    Sec1
    Sec2
=========
Section 1
=========

.. pfsc::

    from gh.example.tutorial.theorem1 import Pf

Okay, this is still not a realistic example, but let's at
least look at how we can point to a proof chart from
a Sphinx page.

There are two forms in which chart widgets can be
written: *role* and *directive*.
Here we write chart widgets in role form.

We can point to :pfsc-chart:`a step in a proof <Pf.R>`
and to :pfsc-chart:`another step <Pf.S>`.
=========
Section 2
=========

.. pfsc::

    from gh.example.tutorial.theorem1 import Pf

This time we write chart widgets in *directive* form.
Actually we're also using rST *substitutions* so that we can define
the directives at the bottom of the file.

We can point to |w01: a step in a proof|
and to |w02: another step|.

.. |w01: a step in a proof| pfsc-chart::
    :view: Pf.R

.. |w02: another step| pfsc-chart::
    :view: Pf.S
In the “Section 1” and “Section 2” pages, you may notice that we have written chart widgets, as we did in Part 2: Annotations; however, since we are now in Sphinx pages, which are written in rST, we used an entirely different syntax to define these widgets.
In fact, in the “Section 1” page we used what’s called an rST role to define each widget, while in “Section 2” we used an rST directive, together with an rST substitution. You can learn more in the reference section on Sphinx Pages.
Build#
After you’ve entered the text in all five files, build your repo (Ctrl-B or right-click in any editor panel).
When the build completes, you should be able to find all five Sphinx pages in the “Structure” tab of the sidebar.
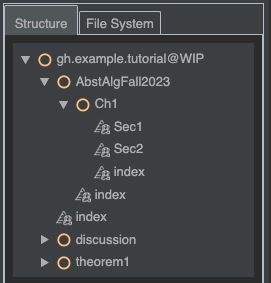
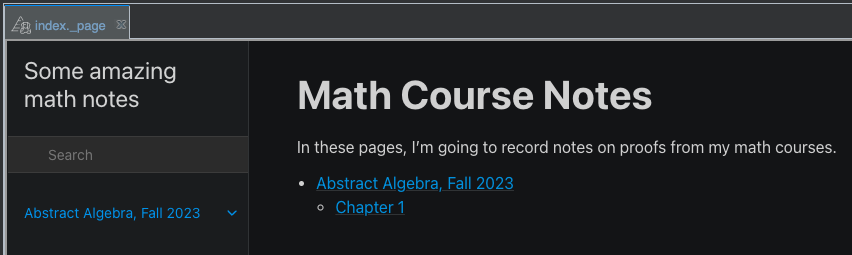
Double-click the root-level index page to open it.
(By “root-level” we mean the one that belongs to gh.example.tutorial;
in the image above, it appears lowest in the list.)
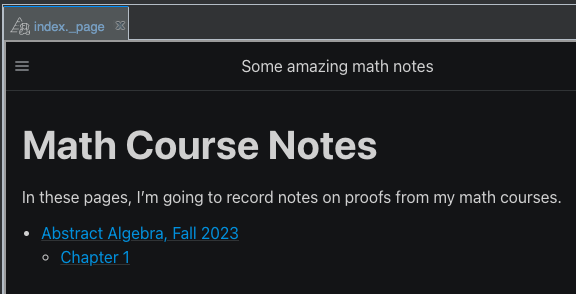
Depending on the width of your browser window, you may get the wide or the narrow version of the page, both of which are depicted below. In the wide version, the table of contents appears on the left. In the narrow version, click the “hamburger” icon at the top-left of the page in order to see the table of contents. Try adjusting the width of your browser window in order to see both versions.
Now click through to “Chapter 1,” and then to “Section 1.”
On the page for “Section 1,” you should see the two chart widgets that you defined in the source code for this page. Try clicking one of them now. A chart panel should open beside the Sphinx page (which will now almost certainly go to the narrow version). Clicking the two chart widgets should select two different nodes in the chart.
Next, try navigating the Sphinx page to “Section 2,” and then once again try clicking the chart widgets. The “Section 2” page gets its own chart panel to control.
Summary#
You have learned how to:
Make a
conf.pyfileMake the root level
index.rstfileForm directories to organize Sphinx pages into a hierarchy
Write some simple Sphinx pages in rST
- Write chart widgets in Sphinx pages using:
roles
directives and substitutions